

How To Draw Anime Elf Ears
This tutorial shows how to draw a female person anime or manga way elf graphic symbol with several variations of the ears, face and colors.

The principal thing that sets anime/manga elves apart from human characters are of course the ears. The pointy ears may likewise be drawn on other fantasy or sci-fi type character types.
This tutorial provides the following:
- A footstep by step breakdown of drawing an anime elf's face
- 4 unlike means of drawing elf ears
- Two variations of drawing the face
- Two different color combinations (for regular or dark elf grapheme)
If you lot are going to be drawing using pencil and paper be sure to commencement with lite lines that you can hands erase. You lot will need to do and so in between some of the steps. You can trace over your line with a darker stroke after you finish placing the diverse parts of the head/confront.
Step i – Draw the Center Guide Line & Tiptop of the Head
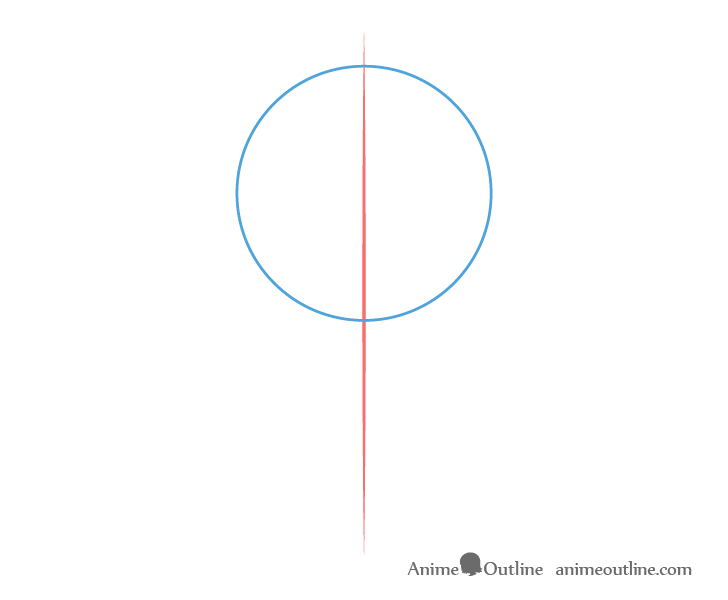
Begin by making a vertical line through the middle of your drawing area. This line tin help you see if both halves of the head are equal in width.
Next depict a circle that will represent the superlative part of the caput.
Pace 2 – Draw the Lesser of the Head
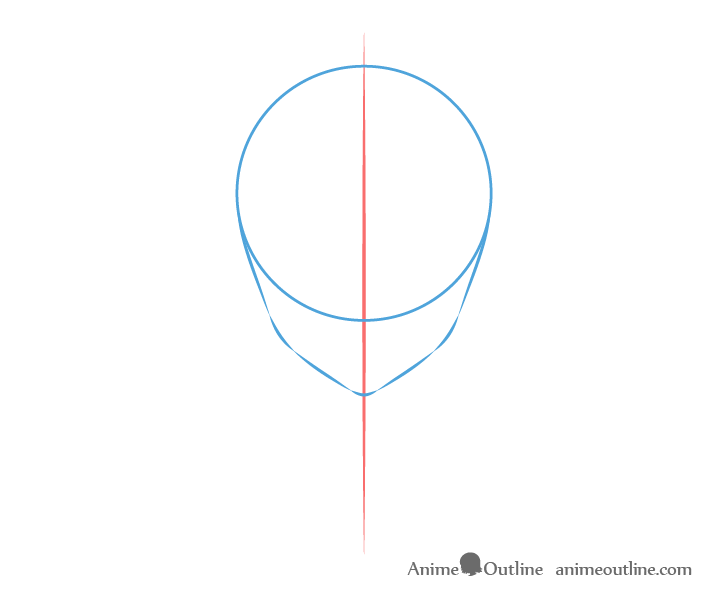
Going down from the circumvolve depict the bottom part of the head. As shown in the above example the bottom portion should start with a pair of lines that and then curve into another pair that finally joins with a small curve to form the chin.
Step 3 – Draw the Cervix & Shoulders
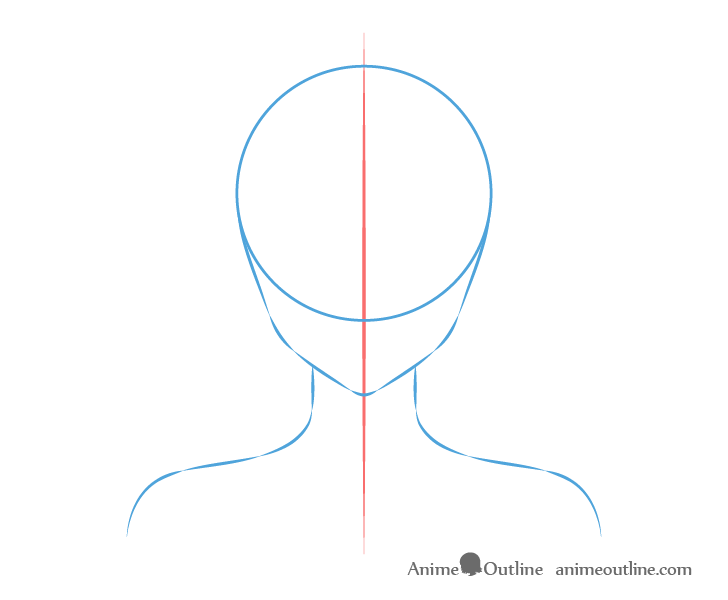
From the bottom portion of the face describe the lines for the neck going down into the shoulders. Adding a bit of the shoulders will make the drawing look more than like an bodily portrait instead of but a "floating" head.
For more than on drawing necks and shoulders encounter:
How to Draw Anime Neck & Shoulders
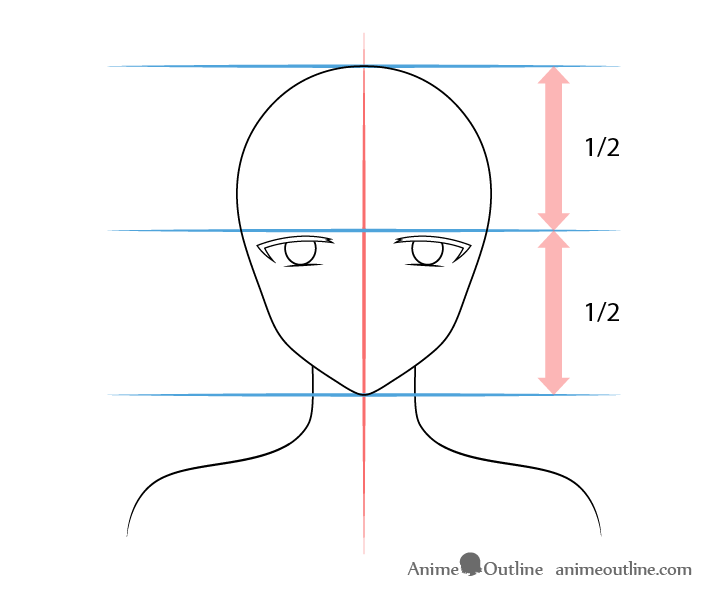
Step four – Position & Draw the Eyes
Vertical Eye Positioning
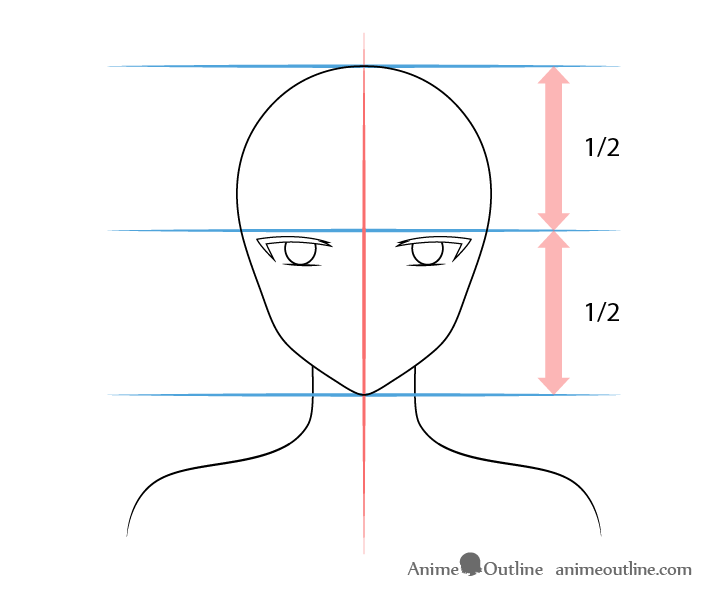
To place the eyes first divide the face up in half with a straight horizontal line. This line tin can likewise help yous make sure that both eyes are on the same level.
In this case the eyes will exist fairly narrow so depict them slightly below the line.
For this first instance draw the eyes with their inner ends angled slightly downwards (towards the olfactory organ).
For at present exit out the smaller details such equally the eyelashes, pupils and reflections. These will be added in a later step.
Horizontal Eye Spacing
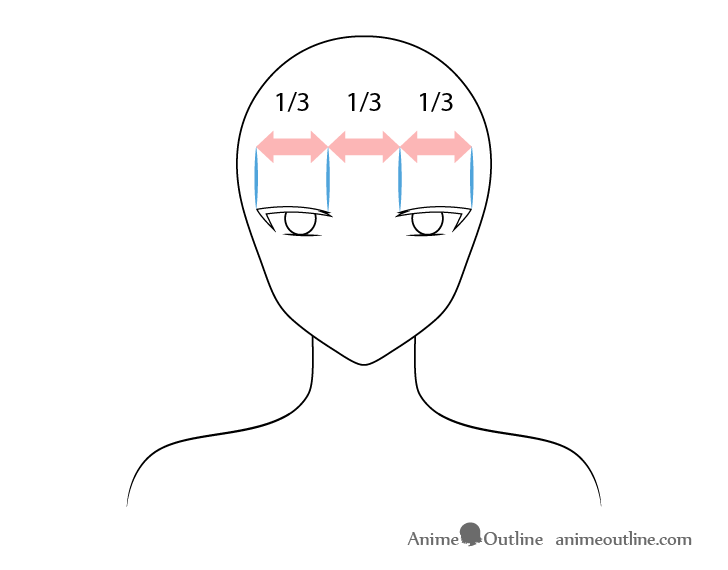
Space the eyes well-nigh far plenty autonomously that yous can fit another centre between them.
Unlike Heart Types
Depending on the type of character you desire to have you tin can draw another variation of the eyes as shown above. This detail one can be for a more "mild" personality.
For this set up of eyes draw them with their outer ends (towards the sides of the face) angled downwardly.
For cartoon unlike centre expressions see:
How to Draw Anime Eyes and Eye Expressions
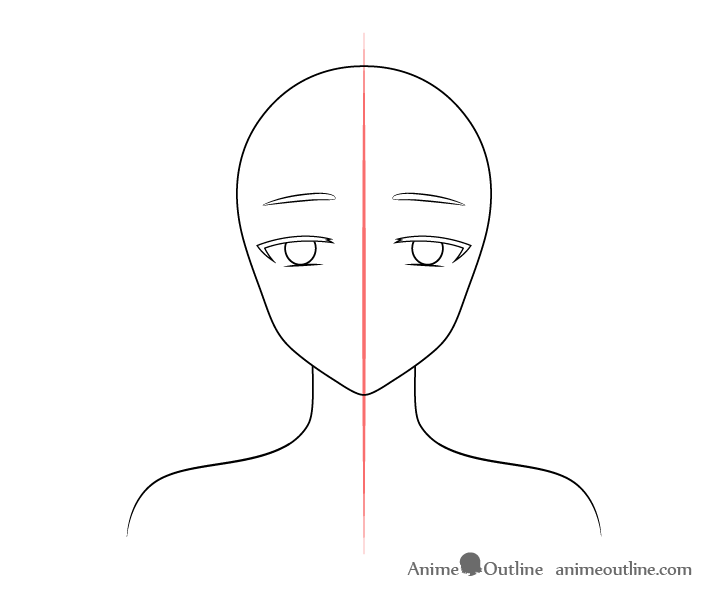
Step five – Position & Draw the Eyebrows

A slight altitude to a higher place the eyes draw the eyebrows. For this set of eyes depict the eyebrows angled downwards towards the nose (same as the eyes).
For drawing different types of eyebrows also encounter:
How to Draw Anime & Manga Eyebrows
Dissimilar Eyebrow Types
If you lot chose the 2nd fashion of eyes in the previous step you tin describe the eyebrows slightly raised and angled the other style.
Step 6 – Position & Draw the Nose
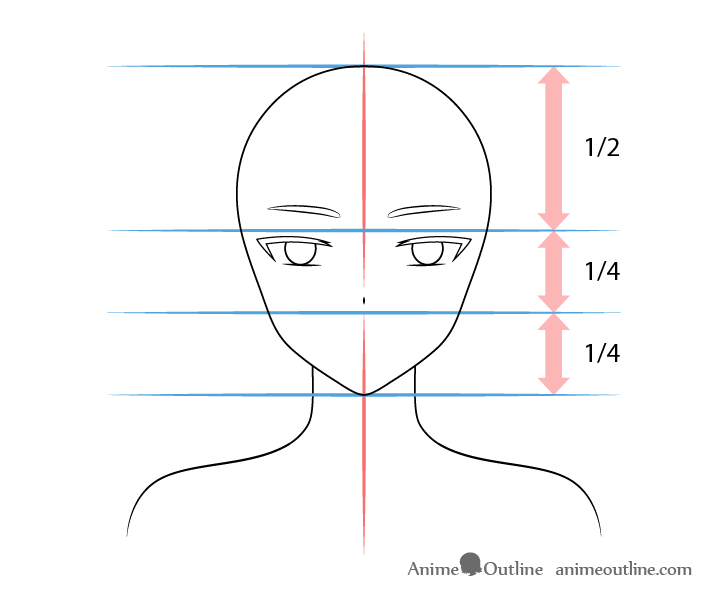
Draw the nose as pretty much simply a dot or tiny vertical nuance. For this particular face position the olfactory organ slightly above the halfway point between the line used for placing the optics and the bottom of the chin.
For more ways to draw noses run into:
How to Depict Anime and Manga Noses
Step seven – Position & Draw the Mouth
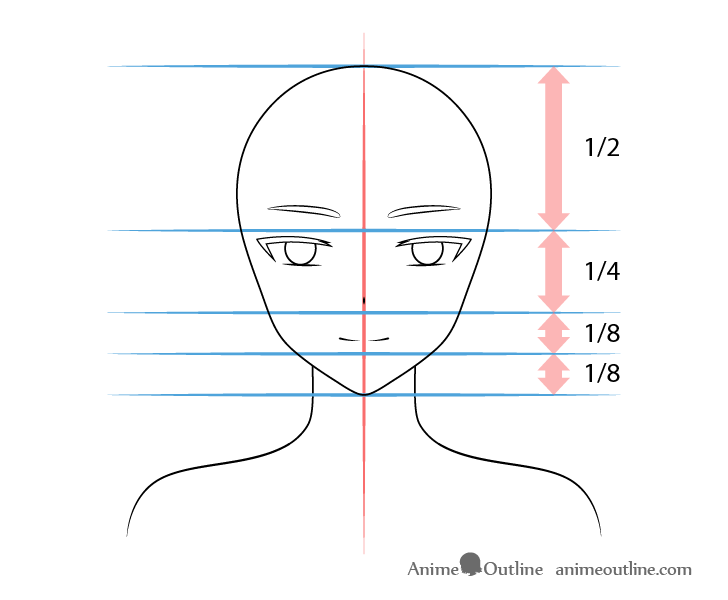
The bottom lip of the mouth (not actually drawn) will be roughly halfway between the bottom of the nose and the bottom of the chin. Yous tin can draw the bodily mouth just a tiny bit above that betoken.
In this case the character will have a bit of a smiling then you tin draw the oral fissure slightly loner and more curved than in it'due south natural country.
For more on mouth expressions see:
- How to Draw Anime Mouths Tutorial
- How to Draw Anime and Manga Oral fissure Expressions
- 12 Anime Facial Expressions Chart & Drawing Tutorial
Step 8 – Position & Draw the Elf Ears
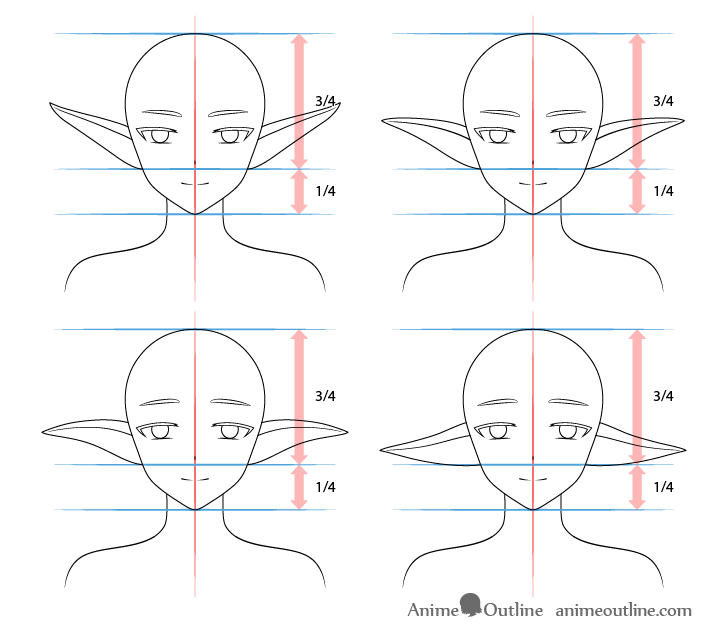
The style elf ears are drawn can sometimes just be a style decision just other times they can besides assistance emphasize a character's personality. For example more than upward pointing ears can mean a more than "upbeat" personality. Down pointed ears on the other hand can exist attributed to characters with a more a more than mild or shy personality.
One explanation for this can be that animals tend to raise their ears when alert/on guard and lower them when scared. This is something that pretty much anybody knows and is used to. Therefore drawing pointy anime/manga ears in a particular ways tin can help send a visual message about the character they are attributed to.
You can apply the commencement two pairs in the example for the regular/upbeat face and the final prepare for the mild/shy one.
For cartoon normal ears run across:
How to Draw Anime and Manga Ears
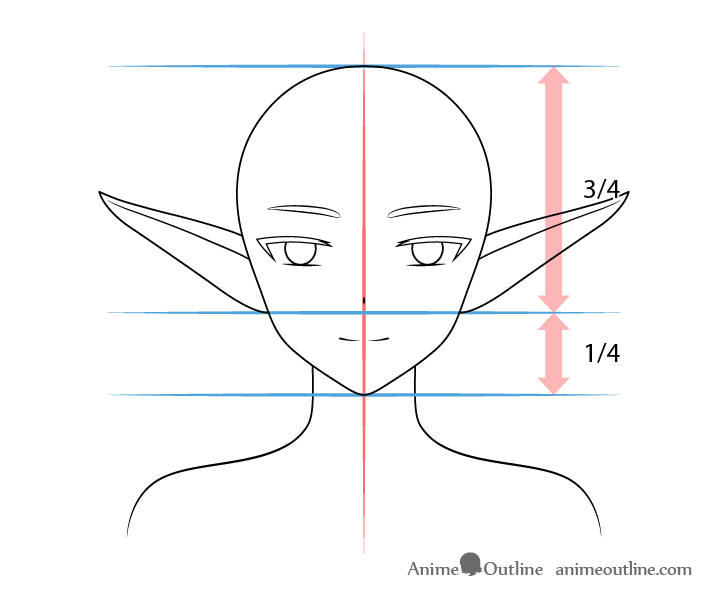
Drawing Raised Ears
While quite oft the base of the the ears is subconscious behind pilus its a skillful idea to know how to place them on the head for times when you do want to show them fully and to aid avoid mistakes.
For this commencement fix of ears you tin draw them with their tips raised fairly high upwardly (past the eyebrows).
Generally you tin can either place the base of the ears with the lesser at the aforementioned level every bit the bottom of the olfactory organ or slightly below it. The top tin exist around the top of the eyes.
Since this is both a stylized and a fantasy character the ear placement is not that important but if yous are way off then your drawing can end up looking weird.
For some mutual cartoon mistakes and tips on avoiding them encounter:
Common Mistakes When Drawing Anime & Manga
Drawing Medium Raised Ears
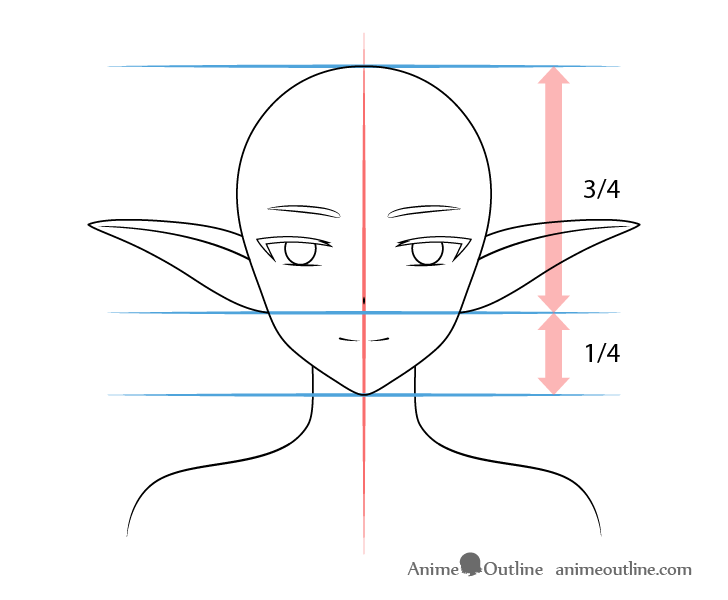
As an culling to the previous example you can depict the ears with their ends slightly lower down.
Position the base of these ears the same way as the previous case. Y'all can do this for the side by side ii sets likewise.
Drawing Medium Lowered Ears

Y'all tin depict the ears with their ends even lower down and combine them with the second prepare of eyes from footstep four for the "mild personality" wait.
Drawing Lowered Ears

Finally you can draw the "reversed" ears where they curve in the contrary direction and hang fairly far downwardly.
Step ix – Draw the Pilus
When cartoon pilus y'all tin can recall of it equally being dissever into the front, sides and back sections as shown beneath.
For a more detailed explanation of this also as examples of other hairstyles meet:
How to Draw Anime and Manga Pilus – Female
Draw the Front Section of the Hair
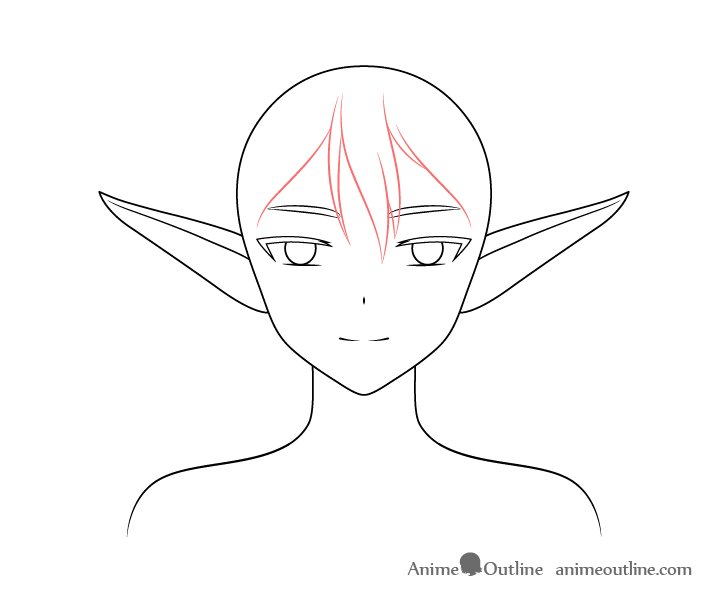
For this particular hairstyle get-go with the front department as shown above. There will exist a bit of a clump in the eye with the rest of the hair swept to each side.
Draw the Side Sections of the Hair
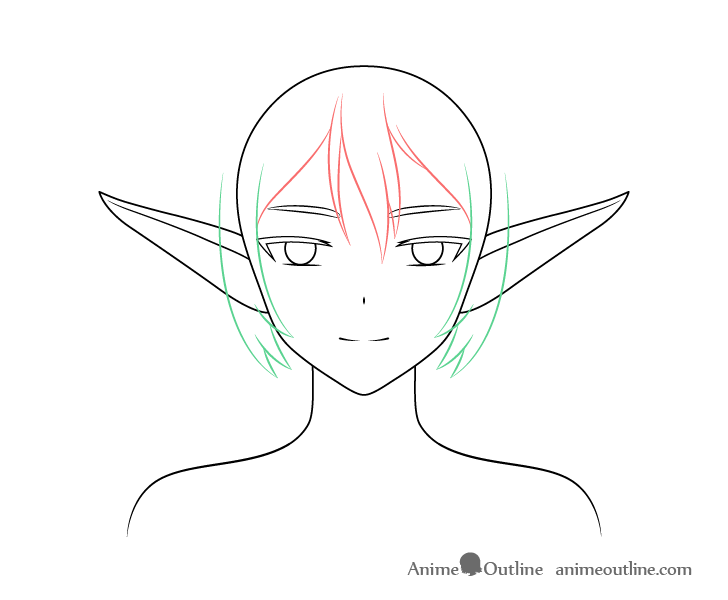
Onto the "front end hair" add together the sides. Generally hair of this length volition tend to "hug" the head/face and so draw each side with a lite curve.
Draw the Back Section of the Pilus
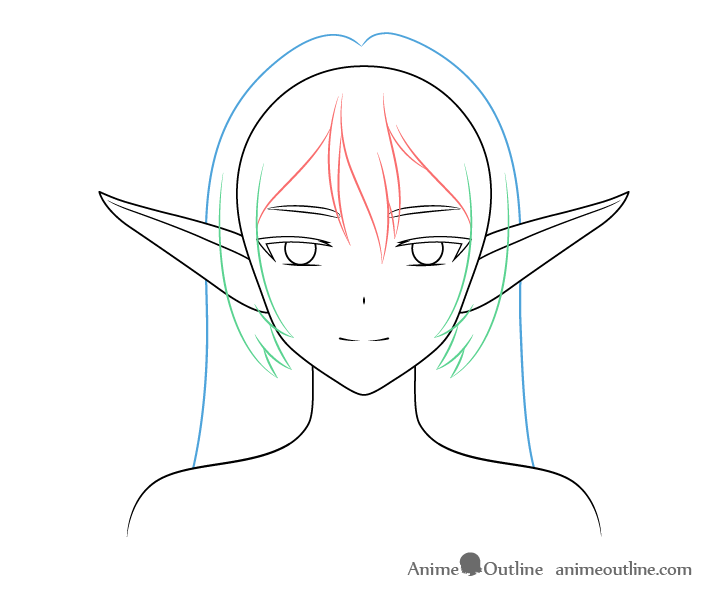
Finally add together the back/top section section equally shown above.
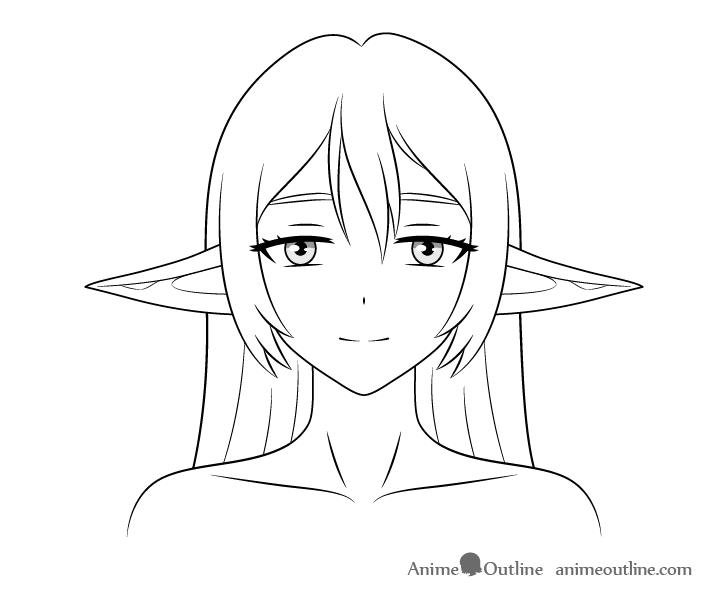
Footstep 10 – Add together the Small Details of the Facial Features

To finish the line drawing add together all of the smaller details.
These include the following:
- Hints of the eyelids (between the eyebrows and eyes)
- Eyelashes
- Inner details of the eyes
- Inner Details of the Ears
- Pilus folds
- Hints of neck muscles/collar bones
Heart Details Drawing
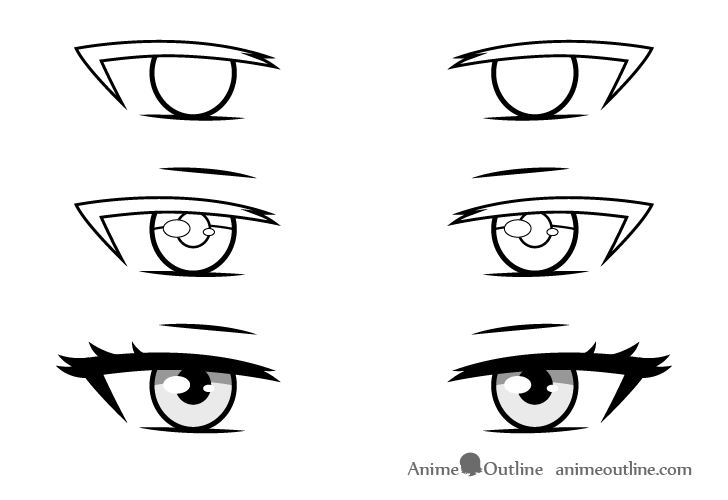
You can see a close upward footstep by step breakdown of drawing the eyes above.
If y'all want to stop at a line cartoon it's recommended that you lot still add together flake of shading to the eyes (equally shown in the example). If you are going to movement onto the coloring office then you can add color instead of the grey.
For a detailed explanation of drawing anime optics run across:
How to Draw Female Anime Eyes Tutorial
For more variations of eyelashes run into:
How to Draw Anime Eyelashes Stride by Step
In one case done adding the small details (if yous were drawing in pencil and made light lines equally was suggested at the start of the tutorial) y'all can at present trace over your drawing with a darker stroke. Alternatively you can also use a blackness pen or marker, merely be careful not to brand a mistake.
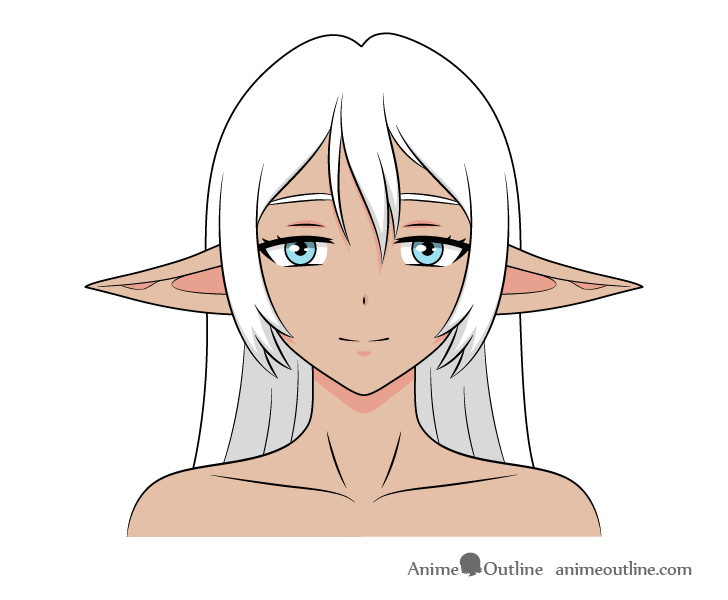
Culling Face Details
Higher up you can also see what the alternative version of this grapheme with the slightly different set of ears/facial features can look similar.
Step 11 – Apply Color
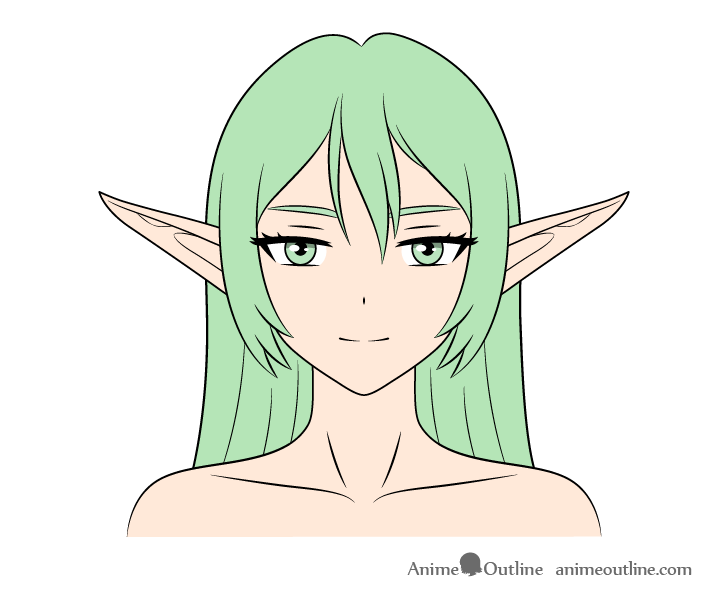
This particular grapheme volition use merely ii master colors. I for the peel and the other for the hair, eyebrows and eyes.
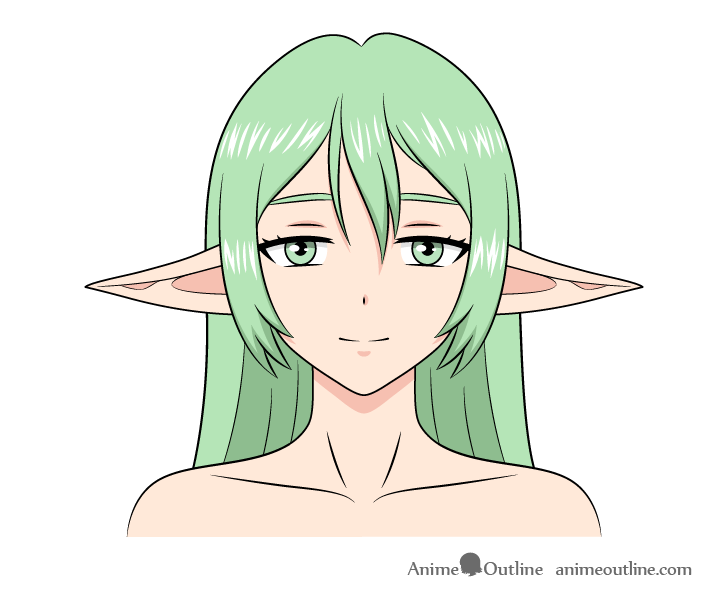
Light-green is a adequately common anime hair color. It can also exist a practiced choice for an elf as they are often associated with forests and nature.
Please notation that if you are coloring on paper you may want to leave the hair highlights white (come across final pace of tutorial) and color effectually them. If yous are coloring digitally you tin add them in over superlative of the hair color. You can also add together them with a white correction pen or white paints.
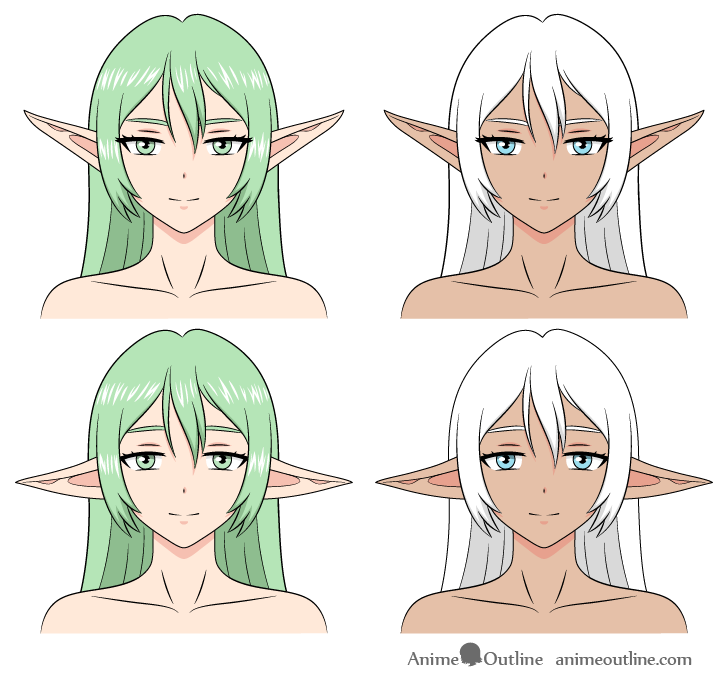
Dark Elf Colour Variation

Alternatively you can also make the character a dark elf past changing up the colors like to the example in a higher place.
Footstep 12 – End the Elf Character Drawing
To finish the elf drawing add some bones shading. In this particular example the grapheme will have very generalized shadows that tend to occur in most common lighting weather condition.
Add the shadows as follows:
- On the head/confront cast past the pilus
- Around the eyelids (really small)
- At the height of the eyes (from the eyelashes)
- Inner parts of the ears
- To 1 side of the nose
- Below the lesser lip (lip itself not actually drawn)
- On the neck from the head/hair
For examples of shading a face up in different types of lighting encounter:
How to Shade an Anime Face in Dissimilar Lighting
You can add the shadow in exactly the same places for the dark elf.
Subsequently you finish the shadows yous can as well add some highlights to the hair. In this case they will exist done as a serial of lines/zigzags only you can as well practice other simpler types of highlights.
There is no need to add highlights for the nighttime elf equally the hair is pure white and they wont be visible.
For examples of other types of hair highlights see:
Different Ways to Draw Anime Hair Highlights
Normal Elf Character
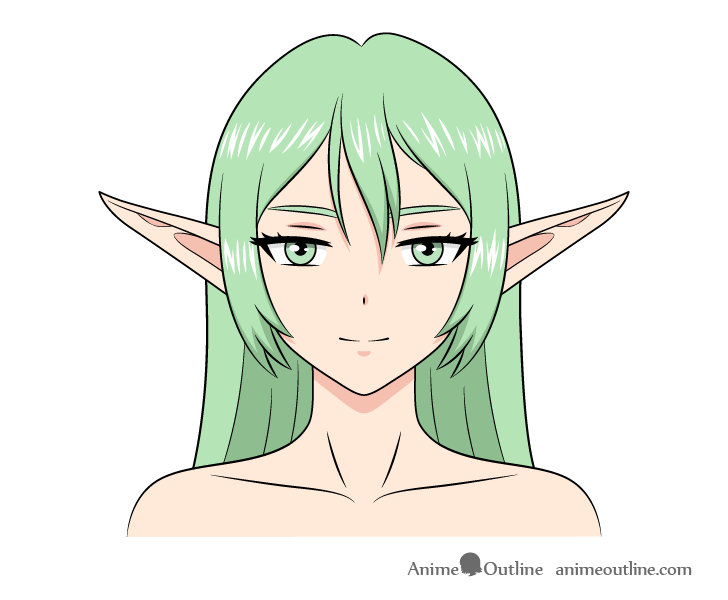
You can see a large finished drawing of the beginning version of the elf daughter in a higher place.
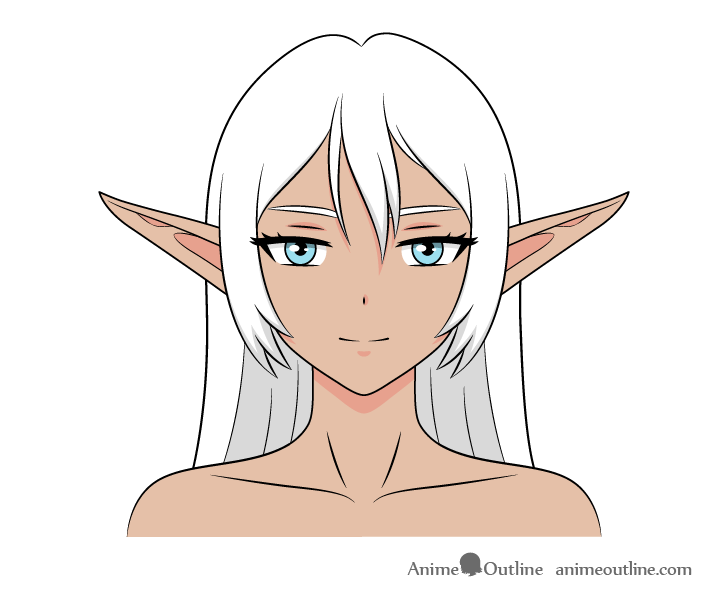
Culling Elf Character
An culling version for the "balmy personality" look.
Dark Elf Graphic symbol
The dark elf version is pretty much the aforementioned only with a different colour template.
Shy Dark Elf Character
And finally for the last instance the dark elf version of the "mild personality".
For more than on picking colors for an anime character also see:
Beginner Guide to Picking Colors When Drawing Anime & Manga
Conclusion
Cartoon an anime/manga style elf character is pretty much the same equally cartoon a human. However with an elf you can use the ears to requite them a bit of added personality equally shown with the iv dissimilar ear types.
For more on drawing fantasy characters see:
- How to Draw an Anime Vampire Daughter Step by Pace
- How to Draw Anime Wolf Girl Pace past Step
- How to Draw an Anime Pull a fast one on Girl Step by Step
- How to Describe an Anime Panda Girl Stride past Step
- How to Draw an Anime True cat Footstep by Step
For more than on showing personality and drawing different types of characters run into:
- How to Draw Anime Characters Tutorial
- How to Draw a Beautiful Anime Daughter Step by Step

Source: https://www.animeoutline.com/how-to-draw-anime-elf-girl-step-by-step/
Posted by: moorelilly1969.blogspot.com
0 Response to "How To Draw Anime Elf Ears"
Post a Comment